Gallery

Riding the exercise bike to retreat!

Wednesday, September 25, 2013

Step Into My Parlor

I joined the local AA (Altered Art) group at Rosie's Art Carnival here in Florence back at the start of summer just as they were gearing up for a big project. The idea was for each participant to create a room in a box. We meet the 2nd and 4th Thursday's of the month and spent a couple of those hashing out ideas, looking at art books and generally thinking out loud about all the ways to create furniture and accessories for a doll house. In August, we went to work, with a deadline of September 26, the 4th Thursday. Hey, that's tomorrow! Good thing I finished my room yesterday. The following is a pictorial of most of the steps along the way. I had some marathon days, where I worked for hours and then it would sit for days while I thought about it. We also brought them in to our meetings for input from the wide variety of artistic talent in the group.

I started with a box found at the Good Will store that used to hold a bottle of whiskey. I completely stripped the box down to bare wood and decided on a vertical presentation that would have 2 floors. The bottom floor was going to be some sort of garden/parlor and the top a library/office of sorts. I covered the walls with paper and for the bottom floor I dug out my Club Scrap Hearth and Home stencil and created a crumbling brick wall with stencil paste.

I inked the bricks with Fired Brick and Walnut Stain distress inks and moved on to creating a circular stair case. I cut 2 circles of charcoal embossed paper and 1 of cardboard (an old cereal box in this case) and cut those into 8 wedges. I sandwiched the cardboard between the papers and glued them all together to create 8 steps. Then punched a hole in the narrow part of the wedge. I painted several bamboo skewers black and cut a couple of them into short 3/4 inch pieces. I slid all of the steps onto one full length skewer and then placed a short skewer at the side of the long skewer and at the upper right corner of the pie piece. I glued these into place one step at a time, holding for several minutes till each one dried. The entire staircase took a few hours to make.


I created a chaise lounge for the garden room out of a dollar store doll house bed cut in half and then a cushion made of fabric scraps, cardboard and brads with a fuzzy purple yarn for trim. 

Here's my girl having a cup of tea while lounging. I also created a hanging lamp from a large bead and scrap of chain and I hung an old key from a sewing hook. The little watering can didn't make it into the final design, but I thought it was cute. 


Here is the finished bottom floor with the staircase in place, a picture of my great grandfather and his friends in the 1920's hanging on the wall, a small flower arrangement courtesy of my mom and a little pair of Barbie shoes with the same fuzzy trim as the lounge chair. 


I created a little secretary desk using matchboxes and toothpicks and decided to display it with the top folded back. There's an inkwell made from a bead and a real feather I found in the yard, a small candlestick from my mom's miniature stash, a lamp made from another bead and a mini rosette, I printed some tiny vintage post cards and stacked some money on the desk too. The chair is also made from a matchbox and cushions made from fabric scraps. I also printed a miniature of one of my favorite Van Gogh's and placed it in a frame found in one of my treasure jars. 


The bookcase along the wall is made from 6 matchboxes, the bottom 2 are cut in half and glued together to form the bottom of the hutch. One of my AA friends, Beverly provided the perfect magazine clipping of books, which I cut out and mounted on cardboard for the books on the shelves. 


 The cat laying on books was from some clipart I found on the internet. I colored it with distress markers and placed it on a little pin woven rug I made from snippets of fibers in my stash. The railings are from a Tim Holtz die on the edge; Old Picket Fence I think. 


Here is an overview of the upper room. 


And here is the finished Room in a Box. Tomorrow, we all put them together and see what our "house" looks like. I'll post pictures of all the other rooms as soon as I can. Hopefully, we will get to display the house for a few weeks at the local library. This was such a fun project and has made me think of tremendous other possibilities for more rooms in a box. 

Monday, August 26, 2013

Blackened Canvas

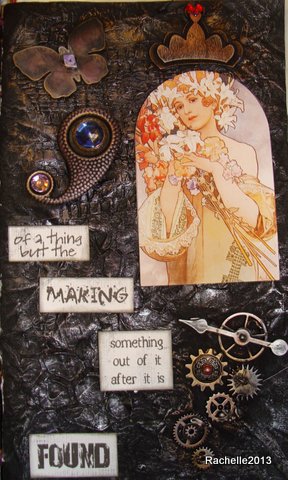
Sounds like a New Orleans entree', but it's really a fun art technique. One of my PAO friends directed me to this blog entry on Ink Stains  and I have been thinking about trying it for weeks. Finally got around to it this week end and I love the results. I even fell in love with the same Andy Skinner face stencil and had to order that (plus a few more, of course). I decided to do this in an existing art journal that I have some blank pages in so you'll notice a difference in sizes of the two sides. Here is the finished page with details below.


You start by adding texture to your base layer. The left side is canvas paper and the right side is handmade paper that has a texture like crumpled paper bag already. I added some tissue, napkins and torn cotton balls.


Then I stenciled with moulding paste with my new Andy Skinner stencils and a Club Scrap one that looks like open weave fabric.

Next you paint everything black with acrylic paint that has been watered down slightly, just so it flows into all the cracks and crevices. (Sorry, forgot to take a pic of that step) Add, some ephemera, broken jewelry bits, metal bits, etc. and test out the position of a picture or 2. Since this is in a journal, I tried to keep my bits fairly flat, but you could go as lumpy as you want.


And.......paint everything black again. Really looks good, huh? thought it was going to be a good candidate for the round file at this point, but I kept plugging along.


Now, comes the fun part. Get out your metallics. I had some silver and gold paints and a set of metallic rub on creams. If using paint, make sure you're using a dry brush that you've wiped almost all the paint off of first; we're going for highlighting the texture here.


 I added some more bling after gluing my pictures and words down. It just looked like it needed a little more sparkle.


I will definitely be trying this again!

Sunday, August 4, 2013

Summer Glory

I had a very enjoyable birthday yesterday, quilting  and relaxing. My quilting friendship group started this sampler quilt, Summer Glory, earlier in the year. I've been slowly working on the blocks and made some significant progress this week.


First of all, I chose to pick my fabrics from all the leftover fabric from the 2 chicken quilts I made, so you may see some interesting patterns in some of the blocks. This one is called Stars and Flowers.


Here is one of the many birdhouse blocks throughout the quilt. 


This one is Dutch Tulips. I really like that cobblestone fabric for the tulips; it really pops.


A nice folksy flag block is next. Took me forever to do the stars until I figured out that they're just pieced, not paper pieced. Read the directions, Rachelle. 


Next is the Watering Can block. I was going for one of those old galvanized metal cans with coppery accents. Not bad, eh?


Birdhouses, Trowel and Star block. 

I have several more ready for applique, but I've made a good start. 


And this is another hand project I've been working on since arriving in Oregon. The day before we left Arizona, my friend Maryann stopped by and handed me this little baggy with hexagon templates and a sample flower. Well, I've been hooked on making little hexagon flowers ever since.


I'm trying to keep to yellow, brown, orange and teal blue, but it just keeps growing and growing. I guess it's headed to being a Grandma's Flower Garden quilt. 

Tuesday, July 30, 2013

Enjoying the Journey

It's been a month of projects for me. Since Club Scrap added a project cabin to their summer camp roster, it really motivated me to get some of the backlog of projects I have. With summer camp ending on Sunday, I dug out the little white birds I bought in June to make a black and white themed driftwood windchime out of my never ending stash of driftwood.


I have been stripping and smoothing this particular piece of driftwood off and on for the last year and finally decided it was ready to use. I added the 3 little white birds and a Tim Holtz tattered banner with Enjoy the Journey stamped on it.


I used large beads and broken jewelry pieces to turn each chime into a sparkly, spinning mini work of art.


Here are a couple of the projects I did for the last week of camp.


These are little paper luggage cases that will hold a set of cards I can use as gifts this year. The top one is made with Moods Over Wings Club Scrap papers and the bottom one the Time & Space papers.


This is a project called The Envelope Please, using 3 envelopes on the inside as tag or gift card holders.
I made this one with Time & Space papers from Club Scrap.


This is another The Envelope Please project using Weather papers.


Next is the project from Come Sail Away stamp kit. I added a little white on blue zentangle to use as a bookmark. 


And last is the project from Private Eye, although I used Bookshelves and Collections papers and elements for the cover. I just love the globe stamp/stencil combo that came in the Bookshelves kit.

Thursday, July 18, 2013

Happy Digi Scrapping

First of all--Happy 30th Anniversary to Roger and Me! I know, I know, it's almost a month late, but hey, we've been busy, not to mention Roger got the mother of all colds on our anniversary (which was June 25), and we were camping, UGH! But I wanted to show that we did celebrate in style this year. Roger got all decked out with a new fishing kayak and I finally got around to designing and having set the beautiful ruby Roger brought back from Thailand on our 25th anniversary. 30 happens to be the pearl anniversary so I wanted a setting that would offset the ruby with some pearls. I think Liz at Coast Jewelers here in Florence did a fantastic job on it.


Roger's been mumbling this quote for the last few weeks: Schmigedy Schmagons where are my Dragons, so I finally asked him where that came from. He said, oh, Will posted that on fb and it's stuck in my head. Well, that triggered a memory of a snow dragon fort we built on the driveway one very snowy year in Post Falls. Wasn't sure I had scanned the pictures, but sure enough I found them. So in honor of Will and his Schmigedy Schmagons:


I also got these pics from our fun walk through the vines at Kramer Vineyards last year. We had such a great time and tasted some fantastic wine. It was so cool seeing and the grapes just budding out in early spring.


One of the prompts for the Weekly Chronicles Challenge over at Club Scrap was a Recipe. I used that to create a journaling card for this layout of my boys playing at the beach with Grandma and Grandpa. They all looked like they were having great fun.


So, What Have I Been Up To?

It's the middle of summer and my blog has been woefully quiet. Well it isn't because I haven't been doing anything. We are now getting ready for our 3rd camping/fishing trip into the interior of Oregon and in between I'm participating in 2 online summer camps, plus I joined an Altered Arts group here in Florence. Hence, this is going to be a long update.


First, I took a Zentangle class at Rosie's Art Carnival ( the best paper crafting store I've ever been in and it's only 2 miles down the road, whoo hoo!) and now I'm tangling on EVERYTHING.


And, of course, I needed a little pouch to carry all my supplies around so out came the black and white fat quarters.


And then summer camp started on PAO and Heather I began making driftwood windchimes from our extensive beachcombing collection. 


I joined a project cabin along with my usual digi cabin over at Club Scrap's summer camp and that has really given the mojo a shot in the arm. Love getting some of my vast stash of projects completed.


Started with this little box. I'll probably store cards or tags in it. Also found this cute little matchbox project in one of the scrap raps. Would be great for little treasure gifts. 

Then, I completed the Pure & Simple pocket album.


And finally, I just completed the Altered Panel project from last year's retreat. Really had alot of fun with this one. Got out the paints, mists, stencils, masks, rubberstamps and embossing powders.


I've also been doing a few digital layouts and I got a new toy, so move on to the next post to see what's been happening in my virtual world as well. 

Happy Summer Crafting!

Thursday, July 4, 2013

Sunrise on the 4th of July

Happy Independence Day! After a blustery, gusty windstorm yesterday, we woke to a sunny, calm morning to celebrate the nation's birthday. Everyone have a safe and joyous holiday!