I started with a box found at the Good Will store that used to hold a bottle of whiskey. I completely stripped the box down to bare wood and decided on a vertical presentation that would have 2 floors. The bottom floor was going to be some sort of garden/parlor and the top a library/office of sorts. I covered the walls with paper and for the bottom floor I dug out my Club Scrap Hearth and Home stencil and created a crumbling brick wall with stencil paste.
I inked the bricks with Fired Brick and Walnut Stain distress inks and moved on to creating a circular stair case. I cut 2 circles of charcoal embossed paper and 1 of cardboard (an old cereal box in this case) and cut those into 8 wedges. I sandwiched the cardboard between the papers and glued them all together to create 8 steps. Then punched a hole in the narrow part of the wedge. I painted several bamboo skewers black and cut a couple of them into short 3/4 inch pieces. I slid all of the steps onto one full length skewer and then placed a short skewer at the side of the long skewer and at the upper right corner of the pie piece. I glued these into place one step at a time, holding for several minutes till each one dried. The entire staircase took a few hours to make.
I created a chaise lounge for the garden room out of a dollar store doll house bed cut in half and then a cushion made of fabric scraps, cardboard and brads with a fuzzy purple yarn for trim.
Here's my girl having a cup of tea while lounging. I also created a hanging lamp from a large bead and scrap of chain and I hung an old key from a sewing hook. The little watering can didn't make it into the final design, but I thought it was cute.
Here is the finished bottom floor with the staircase in place, a picture of my great grandfather and his friends in the 1920's hanging on the wall, a small flower arrangement courtesy of my mom and a little pair of Barbie shoes with the same fuzzy trim as the lounge chair.
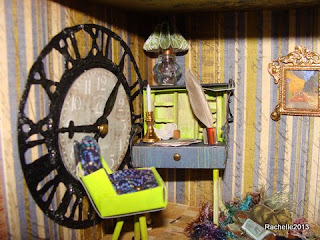
I created a little secretary desk using matchboxes and toothpicks and decided to display it with the top folded back. There's an inkwell made from a bead and a real feather I found in the yard, a small candlestick from my mom's miniature stash, a lamp made from another bead and a mini rosette, I printed some tiny vintage post cards and stacked some money on the desk too. The chair is also made from a matchbox and cushions made from fabric scraps. I also printed a miniature of one of my favorite Van Gogh's and placed it in a frame found in one of my treasure jars.
 The bookcase along the wall is made from 6 matchboxes, the bottom 2 are cut in half and glued together to form the bottom of the hutch. One of my AA friends, Beverly provided the perfect magazine clipping of books, which I cut out and mounted on cardboard for the books on the shelves.
The cat laying on books was from some clipart I found on the internet. I colored it with distress markers and placed it on a little pin woven rug I made from snippets of fibers in my stash. The railings are from a Tim Holtz die on the edge; Old Picket Fence I think.
Here is an overview of the upper room.
And here is the finished Room in a Box. Tomorrow, we all put them together and see what our "house" looks like. I'll post pictures of all the other rooms as soon as I can. Hopefully, we will get to display the house for a few weeks at the local library. This was such a fun project and has made me think of tremendous other possibilities for more rooms in a box.


