


You start by adding texture to your base layer. The left side is canvas paper and the right side is handmade paper that has a texture like crumpled paper bag already. I added some tissue, napkins and torn cotton balls.

Then I stenciled with moulding paste with my new Andy Skinner stencils and a Club Scrap one that looks like open weave fabric.
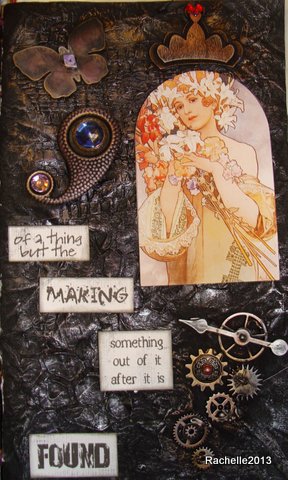
Next you paint everything black with acrylic paint that has been watered down slightly, just so it flows into all the cracks and crevices. (Sorry, forgot to take a pic of that step) Add, some ephemera, broken jewelry bits, metal bits, etc. and test out the position of a picture or 2. Since this is in a journal, I tried to keep my bits fairly flat, but you could go as lumpy as you want.

And.......paint everything black again. Really looks good, huh? thought it was going to be a good candidate for the round file at this point, but I kept plugging along.

Now, comes the fun part. Get out your metallics. I had some silver and gold paints and a set of metallic rub on creams. If using paint, make sure you're using a dry brush that you've wiped almost all the paint off of first; we're going for highlighting the texture here.


I added some more bling after gluing my pictures and words down. It just looked like it needed a little more sparkle.


 I will definitely be trying this again!
Cool looking piece of art. Thanks for explaining how you do the steps....I like all the different elements you use.
ReplyDeleteGreat project and technique. I'll have to try that one for sure. Thanks for the tut.
ReplyDelete